Monday, August 30, 2010

My DH and I were invited to an anniversary party this weekend, so I decided to make cards based on this design. I started with the card but instead of using designer paper I got out my Big Shotz and a Sizzix embossing folder. I think I may have cut the base card the wrong dimension since it ended up being a 6" square card instead of the A2 I made last time but it worked out great and I really liked the card. The sentiment on the outside is from a Hero Arts clear set and the interior sentiment "Congratulations" is a old wood mount Hero Arts set. A rather elegant card, if I do say so myself but somehow it just wasn't the card for Tom & Jen.


So I started again with a Penny Black animal stamp. Tom & Jen are such a fun couple. He has an incredible sense of humour and Jen is just so sweet. Elegant just didn't quite suit them. These cute little ducks look to me a like a fun loving couple. I coloured them with copics and once again realized how important the right paper is. I ended up stamping the ducks again and using Bic Mark-its instead of getting the right paper. The embellishment isn't on this card yet. The attachment it isn't necessary but I really like how it anchors the flap.


I absolutely love this card design. It is a great way to use up bits of designer paper or add texture with embossing folders. I can also see how diecut shapes could be added on the left panel f0r dramatic effect.

Thursday, August 26, 2010

Summer Ending

Our part time student employee had what we think will be her last day at Frog's Whiskers. Cassie has enrolled in Loyalist College this fall and although she plans to continue to live at home, she is trying to get a job closer to Belleville. Cassie has been a part of the Frog's Whiskers family for 3 years, so we had a little going away party for her yesterday and yes there was cake.

Good luck Cassie and thank you for all you have done to help make Frog's Whiskers a great place.

Wednesday, August 25, 2010

July Challenge Cards - continued

Lauralee's card is understated elegance. The grass stamp is from Hero Arts stamped and embossed with Tim Holtz distress inks and clear embossing powder. The decorative border is handmade paper distressed and inked with Peeled Paint. The sentiment is from Papertrey Ink. Lauralee uses a distresser on many of her cards and she put it to good use on this one. All of the elements have been distressed. She also often uses a corner rounder on her cards. So cute and something I hadn't thought of doing until I saw her cards.


As I have said before, I love Penny Black!!! For this card I dug through my stacks of designer paper to find colours that would coordinate. The decorative element is hand made paper cut with the decal edge blade on my paper cutter. The stamped image is coloured with copics. I think the sentiment is from a clear Hero Arts set. Wow now that I see the picture of my card I can see just how crooked I set the elements down. Not my strong suit, that is something I will have to take more care in finishing!


Cassie used Nestibility Large Label to create her layering pieces from designer paper. The flower stamp is from Technique Tuesday with a black gem added to the center. Cassie originally had a sentiment in the upper left hand corner but wasn't thrilled with the look. She decided to stamp a second outline flower from the same set. She added dollar store paper flower and another gem to finish. The sentiment is from a Hero Arts set.


Jacqui is our resident non-card maker. Very difficult to tell from the cards she has been making. Barb tells us she makes beautiful cards and then throws them out because she doesn't like them. She water coloured this wonderful Penny Black stamp and layered to her hearts content. The butterfly in the upper left is from Rosewood and I have misplaced my notes, so I don't know who the sentiment is from. Jacqui should be proud of this card. It is so gorgeous.

Tuesday, August 24, 2010

July Challenge Cards


Barb chose this sketch for our challenge in July. She added the stipulation that it must have at least one stamped image. This is such a fabulous sketch, there is just so much that could be done with it.


Darlene created this card based on our challenge. She stamped Rosewood Lilies twice, coloured and then cut and popped the facing lily. The lower layered piece has dragonflies punched in each corner. She then added a bit of colour to show through the punched shapes. Very effective and such a summer time card.


Donna did something a little different for her card. She created a co-ordinating fabric strip to her card. The fabric really adds a textural element to the card. The Rosewood Winter Cardinal is stamped with green ink and highlighed with a dab of red glitter glue. Donna created the decorative border with a punch. Although difficult to see in the photo she has balanced the card by stamping Rosewood Season's Greetings Sm in the lower right corner.


Barb made good use of her "toys" for this card. She used her Cricuit to cut Tinkerbell and Believe. I'm not sure but I am guessing she also used her Criuit to cut the layering elements. The black layer under the paper flowers has been run through CB swirls folder. Barb stamped Rosewood Impatiens and added a very beautiful bit of colour. She used the same stamp to create the base element for her card.

Saturday, August 21, 2010

Friend card

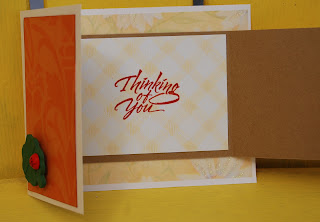
I needed to make a "thinking of you" card when my weekly email from Splitcoaststampers arrived. Near the bottom of the email were instructions for a card I thought looked really interesting. Check out the instructions here.
This is one of those cards that looks complicated but when broken down is really easy. I knew I wanted paper that reminded me of sunflowers for this card.


Although it is difficult to tell the stamped sentiment is actually a flap that tucks under the lady bug embellishment. The sentiment is from Obsession Impression and for whatever reason I had a bugger of a time stamping a nice clear image. I think my clear block may have been a bit big.

Below is the inside of the card showing the flap open, stamped with an old Hero Arts sentiment.


However once I had the card all nicely assembled I realized that I need to mail this particular card. I wasn't sure the lady bug bling would fit the required whatever from Canada Post. Luckily I had decided to make 2 of these cards right from the start. Normally I am not that organized but I was that day. I used a beautiful butterfly sticker and added a dragonfly brad to act as the anchor for the flap. I also decided to distress the edges a bit on the outside. Looks like I had better practice that technique a bit more :). I like the look of this card and this one would definitely pass Canada Post's requirements. I think I may have found the design basis for this year's Christmas cards.


B&W KISS swap

I belong to an internet group of stampers and one of the swap mistresses suggested a KISS (keep it simple stamping) black and white swap challenge. Although I am usually a lurker on the site, I thought I could handle this challenge. I really wanted to add ribbon to this card but no embelishments were allowed. Just paper and stamps for this challenge.


This is the card I created for the challenge. Although it is difficult to see I do have a white base on this card. I used a gorgeous snowflake from Gelatins stamped in Snowflake Tinsel. Layered onto the a new cardstock Rose-Marie has just brought it. It has a a gorgeous shimmer. The verticle Rosewood Merry Christmas was the perfect stamp to balance the card. I used MS deco edge punch to create the border on the layering paper. Looking at it now, I should have been more careful punching the edges. Looks like I choppped off one of the fans. Ooops!!!

Friday, August 20, 2010

June Card Challenge - Continued


I thought I had better finish posting the June challenge cards before I get the August challenge cards in my hand. Geesh, I can get behind in a hurry!

Jess' card makes great use of some beautiful vellum we had stashed. She cut the shapes with Nestibility dies and layered them onto the base. In hindsight and with a bit more time, we should have added another element in the bottom right corner. Jess is a teenager and pulled this card together the night before the cards were due. Sigh, like most of her homework....


This is the first visualization I had for this challenge. The minute I saw the sketch I thought of a tri-fold hold. In my mind I thought it would work but then I started second guessing the design and made the second card shown. I used a Nestibility die to cut the hearts, MS butterfly punch, a Fiskars heart punch and some dollar store bling. The bling by the way was gorgeous in the package but was somewhat challenging to apply neatly to the card.


The second card is a gate fold card that uses a bunch of different papers to make up the layered hearts. This card seemed to demand a tone on tone colour palette and I am sure you will notice the slightly squished bling and the nip out of the corner of the heart. Yes, I messed it up a bit but it serve as a reference for me. The other girls got nearly perfect cards.


Barb has used her Cricuit to full advantage for this card. Every time I see her cards I think about making the leap to ownership a little more. She added some bling and used some of her paper stash to complete this card. A beautiful card.


Barb made this bonus card, using her Sesame Street Cricuit cartridge. Who doesn't love the Cookie Monster. A really cute card that completes the elements of the sketch.


Cassie's card replicated the challenge sketch almost perfectly. She stamped a Rosewood heart with Brilliance (for shimmer). The Nestibility hearts were given a good work out for this challenge. Since Cassie chose to position the hearts near the bottom of the card, the addition of ribbon was necessary. We don't own that much ribbon so Cassie took a white polka dotted ribbon and coloured it with a Bic Mark It, instantly co-ordinating ribbon.

Jacqui's card was absolutley stunning. She used a beautiful Magenta stamp for her central image., which she had purchased the previous month after play day. Then she used her Cricuit to cut a little blue bird, the branch and the word "love". (I love that script!). A perfect card stock for the base, some ribbon and she layered the images to create this wonderful card.


Wednesday, August 18, 2010

Tim Holtz Demo Days

I stoppped by the store yesterday, just to see what I have been missing. Rose-Marie was so happy with the Tim Holtz Demo Days, everyone was so enthusiastic. Below are samples of the cards Rose-Marie taught during the classes on the demo days. We still have a couple of the Compendium of Curiousities left. A great reference guide to all things Tim Holtz.


When Rose-Marie was deciding what she would be teaching during the demo days she quickly realized that there are so many different techniques that could be taught. She decided that another couple of classes would be necessary to even begin to explore all that can be done with Tim Holtz products. Four more classes will be offered. There will be 2 classes on Friday, Sept 17 and 2 classes on Saturday, Sept 18. Classes both days will be at 10:00 a.m. and 1:00 p.m. Preregistration and pre-payment are required.

Monday, August 16, 2010

Back to Work

In my spare time I hook rugs in the traditional manner. Last week I was able to attend rug camp at Loyalist college under the instruction of Jeanne Fields. This wonderful lady is so knowledgeable and passionate about this craft but her time as a teacher is coming to an end. It was very important to me that I take this class to learn what I can from this delightful lady. She called me the "young one" throughout the week, something I wasn't used to hearing. If you are interested check out Jeanne's website here.

I am sure, at some point, that you have been involved in a setting where everyone around you shares the same passion (maybe that should read obsession!!!). It is comforting to be surrounded by like minded people. Unfortunately we lost one of our classmates suddenly due to a health issue during our week of instruction. Her friends in the class commented on how supportive everyone in the class, strangers until we met on Monday, supported them in their time of grief. We left class with hugs and some wonderful new friends.

Friday, August 6, 2010

June Challenge - Correction

Donna phoned me this morning and apparently I have to make a correction to the post from yesterday. Although I didn't check, the butterfly I referred to on Donna's June challenge card must have landed there from somewhere else. I gather it was in the bag I had the cards stored in and I didn't even notice it there until I was doing yesterdays post. Sorry Donna.

We are off to Campbellford Fair tomorrow. My girls are showing their 4-H calves, so I won't likely get the rest of the cards posted until Sunday. Enjoy your weekend.

Thursday, August 5, 2010

June Challenge

I have my "stuff" together...finally and I pleased to share with you the June Challenge cards.

Just to refresh your memory, this was the sketch Cassie chose for our challenge card but she stipulated that the cards must have blue on it. Cassie loves blue!


Lauralee really had fun with this challenge and sent 3 cards for the challenge.


These 2 cards cards are quite simliar. The flourishes Lauralee used are so beautiful. The hearts are flaps that contain sentiments and are topped with Lauralee's favourite MS butterfly punch, which are stamped and embellished with pearls.

For her last card, she took a slightly different path but still has all the elements.


This card contains a sassy sentiment that is perfect for the cover of the card. And who doesn't love puppies?

Below is the card Donna created. She stamped a Rosewood stamp (K20 Hearts & Flowers) in blue, cut off the top flourish and coloured the flowers. She stamped a flourish on the background and ran it through CB Swiss dots. She popped the stamped image over the flourish and tucked a MS punched butterfly underneath. A beautiful piece of ribbon, completed the challenge.


Darlene's card (below)has a entirely unique take on the challenge. The sarcophagus is a Cricuit cartridge and the coins I suspect are left over from one of her belly dancing costumes. Darlene has stamped and embossed a gold flourish on the base card and layered the cricuit die on top. She also added the ribbon element from the original sketch.


Tomorrow (hopefully) I will get the rest of the cards from the June challenge posted. I will also check to see if I have better information about the what stamps the ladies used in their cards.

Wednesday, August 4, 2010

Tim Holtz Demo Days


We have a bunch of products that carry the Tim Holtz logo and since Rose-Marie is the master of pulling everything together, she has brought in products from other companies that co-ordinate with the Tim Holtz products. We have Tim's "Compendium of Curiosities" available. These are the handiest guides for all thing Tim Holtz, lots of tips, techniques and projects are shown in the Compendium.


As we have begun planning for this event, it became apparent there was more to be learned than a quick 5 or 10 minute demo could show. It was then that Rose-Marie made the decision to hold classes, which will teach you how to use Tim Holtz's products alone and in combination of other companies products. Two 2 hour class are offered at 9:00 and 1:00 at a cost of $20. Pre-registration and pre-payment are required. Please bring a class kit with you. Class kit include basic items such adhesive, cutting tools, and pencils.

Tuesday, August 3, 2010


On playday this month, I made this cute little card for my sister's little girl who will be turning 5 this month. (I am a huge fan of the Penny Black animals.) This little sheep was highlighted with copics and placed on a new frame folder from Cuttlebug.


The new Cuttlebug Emboss Plus folders look very different from the products CB has previously released but they work well and create really gorgeous accent pieces for your paper crafts. The sentiment is from a clear Hero Arts set and the dragonfly brads were the perfect finishing touch

Monday, August 2, 2010

Catching up

One of our play day members is a belly dancer extraordinaire. Darlene dances with a troupe that performs in the Cobourg area and each summer to celebrate the summer solstice they dance on the beach at Victoria Park. Donna & I have been trying for a couple of years to get down to see Darlene dance and finally we made it.

And since I really like to have faces to go with names here is a photo of Donna & Darlene dancing on the beach.


Darlene makes her own costumes for her performances. And although I convinced Donna to try belly dancing (she loved it), she isn't quite ready to perform....yet!

Hmmm blogger isn't talking to me at the moment so I will add the other picture later.

UPDATE - August 5

Yippee, blogger is talking to me again. As I said Darlene is a performing belly dancer as opposed to Donna & I who are an enthusiasts but just for our own enjoyment. Belly dancing is so much fun. I would highly recommend trying a few classes and I do mean a few classes. It takes some time to get comfortable with the jiggly bits. Isn't her costume beautiful, Darlene is so talented.