Showing posts with label hero arts. Show all posts

Saturday, January 8, 2011

October Challenge - con't

Darlene must have jumped all over this one...no pun intended. She headed to the grocery store and picked up brown paper lunch bags. She cut ears, stamped Rosewood Easter Eggs across the bottom and coloured them. Next she added googlie eyes, drew on a mouth, fluff nose & fishing line whiskers. The tag is Rosewood Flourish Easter Egg stamped on shiny gold card stock. This cute little bag could be made in any size to deliver gifts from the Easter bunny or they would make great favour bags for a children's party.


Lauralee's bag is as usual a work of art. She stamped the Hero Arts background stamp in brown ink, coloured in the hearts with a red Marvy marker and highlighted the image with a white gel pen. She used a Nestibility to cut the heart shape in the bag and then lined the bag with some beautiful hand made paper. Walnut Distress ink on the edges of the bag adds dimension. Lauralee created her tag with the same heart shaped Nestibility in white card stock. She attached the cut shape from the bag to complete her tag. A twine bow, some walnut distress ink and raffia make an adorable bag & tag combination.


Cassie had brightly coloured bags to work with. She used a coordinating stamp and punch set from Stampin' Up to create the butterflies which she coloured with chalk. Her tag was a die cut that she stamped with Rosewood Paper Swirl and coloured with Bic Mark-Its. Cassie stamped Rosewood Friend on scrap paper, trimmed it out and dragged the edges with the red Mark-It to pull it all together.


Barb's card was layered onto a cream coloured card that she distress with olive pigment ink. The brown card stock was passed the CB folder swirls. She stamped Rosewood Northern Pine which she cut in half and layered onto green card stock. She used the same sentiment on her bag. Barb also created a similar layered image on the reverse of her bag. I apologize for the lack of a photo for the reverse of Barb's bag.


Barb had a fantastic interpretation of this challenge. She created her bag from newspaper based on instructions she found here. She did tell me that she made the bag a size bigger than the instruction make. I'm not sure where the sentiment is from but she created a great focal point by setting the brown mat off centre. The tag was created using her Cricuit "A Child's Year" cartridge. Don't you just love that shape?


Thursday, October 28, 2010

Birthday Wishes

My niece is celebrating her 8th birthday next week and I needed a card to send to her. Cassie is on reading week so I asked if she could fit making a card into her busy schedule while I was at work on Tuesday.


She coloured the Penny Black stamp with Copics and used a clear set of Hero Arts letters to "write" the sentiment. She tells me that was harder to do that she thought it would be. First she had the letters perfectly aligned but backwards and so she rearranged the letters but overlooked the "b" in birthday that should be a "d". Oh well Shannon is as I said 8, we are hoping she won't notice (sheepish grin). Shannon loves to stamp so in this card I sent a set of clear stamp that are only words for her to create with. Let's hope her birthday cards won't have stamped spelling errors.

Monday, August 30, 2010

My DH and I were invited to an anniversary party this weekend, so I decided to make cards based on this design. I started with the card but instead of using designer paper I got out my Big Shotz and a Sizzix embossing folder. I think I may have cut the base card the wrong dimension since it ended up being a 6" square card instead of the A2 I made last time but it worked out great and I really liked the card. The sentiment on the outside is from a Hero Arts clear set and the interior sentiment "Congratulations" is a old wood mount Hero Arts set. A rather elegant card, if I do say so myself but somehow it just wasn't the card for Tom & Jen.


So I started again with a Penny Black animal stamp. Tom & Jen are such a fun couple. He has an incredible sense of humour and Jen is just so sweet. Elegant just didn't quite suit them. These cute little ducks look to me a like a fun loving couple. I coloured them with copics and once again realized how important the right paper is. I ended up stamping the ducks again and using Bic Mark-its instead of getting the right paper. The embellishment isn't on this card yet. The attachment it isn't necessary but I really like how it anchors the flap.


I absolutely love this card design. It is a great way to use up bits of designer paper or add texture with embossing folders. I can also see how diecut shapes could be added on the left panel f0r dramatic effect.

Wednesday, August 25, 2010

July Challenge Cards - continued

Lauralee's card is understated elegance. The grass stamp is from Hero Arts stamped and embossed with Tim Holtz distress inks and clear embossing powder. The decorative border is handmade paper distressed and inked with Peeled Paint. The sentiment is from Papertrey Ink. Lauralee uses a distresser on many of her cards and she put it to good use on this one. All of the elements have been distressed. She also often uses a corner rounder on her cards. So cute and something I hadn't thought of doing until I saw her cards.


As I have said before, I love Penny Black!!! For this card I dug through my stacks of designer paper to find colours that would coordinate. The decorative element is hand made paper cut with the decal edge blade on my paper cutter. The stamped image is coloured with copics. I think the sentiment is from a clear Hero Arts set. Wow now that I see the picture of my card I can see just how crooked I set the elements down. Not my strong suit, that is something I will have to take more care in finishing!


Cassie used Nestibility Large Label to create her layering pieces from designer paper. The flower stamp is from Technique Tuesday with a black gem added to the center. Cassie originally had a sentiment in the upper left hand corner but wasn't thrilled with the look. She decided to stamp a second outline flower from the same set. She added dollar store paper flower and another gem to finish. The sentiment is from a Hero Arts set.


Jacqui is our resident non-card maker. Very difficult to tell from the cards she has been making. Barb tells us she makes beautiful cards and then throws them out because she doesn't like them. She water coloured this wonderful Penny Black stamp and layered to her hearts content. The butterfly in the upper left is from Rosewood and I have misplaced my notes, so I don't know who the sentiment is from. Jacqui should be proud of this card. It is so gorgeous.

Saturday, August 21, 2010

Friend card

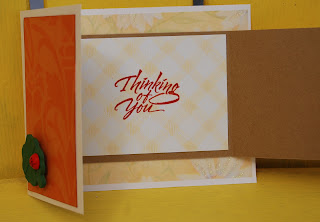
I needed to make a "thinking of you" card when my weekly email from Splitcoaststampers arrived. Near the bottom of the email were instructions for a card I thought looked really interesting. Check out the instructions here.
This is one of those cards that looks complicated but when broken down is really easy. I knew I wanted paper that reminded me of sunflowers for this card.


Although it is difficult to tell the stamped sentiment is actually a flap that tucks under the lady bug embellishment. The sentiment is from Obsession Impression and for whatever reason I had a bugger of a time stamping a nice clear image. I think my clear block may have been a bit big.

Below is the inside of the card showing the flap open, stamped with an old Hero Arts sentiment.


However once I had the card all nicely assembled I realized that I need to mail this particular card. I wasn't sure the lady bug bling would fit the required whatever from Canada Post. Luckily I had decided to make 2 of these cards right from the start. Normally I am not that organized but I was that day. I used a beautiful butterfly sticker and added a dragonfly brad to act as the anchor for the flap. I also decided to distress the edges a bit on the outside. Looks like I had better practice that technique a bit more :). I like the look of this card and this one would definitely pass Canada Post's requirements. I think I may have found the design basis for this year's Christmas cards.


Tuesday, August 3, 2010


On playday this month, I made this cute little card for my sister's little girl who will be turning 5 this month. (I am a huge fan of the Penny Black animals.) This little sheep was highlighted with copics and placed on a new frame folder from Cuttlebug.


The new Cuttlebug Emboss Plus folders look very different from the products CB has previously released but they work well and create really gorgeous accent pieces for your paper crafts. The sentiment is from a clear Hero Arts set and the dragonfly brads were the perfect finishing touch

Monday, June 7, 2010

May Challenge - Continued.

Jacqui's May card creation is first up today. Jacqui made good use of her Cricuit to make this shades of pink card. She stamped the Rosewood Calla Lillies in a a pale pink to make an all over background on her base card. The shaped elements are all Cricuit and the cute little bunnies are popped into the medallion. NOTE: the "m's" on the bottom of Jacqui's card are part of the frog I used to hold the card and are not part of her design. I do like the look though but not for her card.


For my challenge card, green chose me. I intended to make a blue card but somehow green spoke to me for this challenge. The base card is stamped with an old Magenta stamp. (I just can't get past a plain base card. It just looks naked.) I found some old tags, sponged them green inks to create the medallion. The sentiment is Obsession Impression and Distress Stickles Peeled Paint was added to highlight the oval. I distressed the edge of the designer paper with Memories Soft Leaf. I cut the bracket from Tim Holtz Hanging Sign diecut and trimmed it to fit the card then sprayed the brackets with Smooch Vanilla Shimmer.


And now for our May challenge mistress. Lauralee had two cards in mind with the challenge and sent them both for us to see. Since Lauralee has already posted how she made her cards on her blog. I will send you to her blog to get the instructions.


This is the worst photo of Lauralee's butterflies in flight. White is so hard to really photograph well for an amateur photographer such as myself. I intend to try again this afternoon when the sunshine isn't so bright and hopefully I can get a pic that will do her card justice. The instructions for this card are lengthy but not complicated and again I am sending you to Lauralee's blog

These card challenges are so much fun and really do stretch the creative limits. Cassie has chosen June's Challenge which I will share later.

Monday, May 24, 2010

Barn Board Not Just a Background

Rosewood Barnboard is featured in these cards from Lauralee.


So I lied, Barnboard makes a great background. Lauralee stamped with brown Distress Inks and quickly dipped the image in clear embossing powder. The Rosewood Daisy Head was stamped and embossed in white on scrap white. Gold glitter glue as added to create the flower centres. The leaves (sorry stamp unknown) was stamped with green distress inks and embossed with clear on scrap. Both the flower and the leaves were then cut and attached to the card. Unknown sentiment, stamped directly on the Barnboard image.


Lauralee created a gorgeous background technique by cutting the stamped Barnboard into strips and then attaching them to a base card either as "shakes" or board, as shown here....


I think the butterfly is a digital image from Hero Arts...beautiful! The "boards" are attached with brads. The Rosewood Friend is on the card in the foreground. A decorative edge was punched, a bit of ribbon and the card is done. Donna told me how Lauralee got the embossing just on the tips of the butterfly wings but I have completely forgotten. I will get in touch with Lauralee next week to find out.

UPDATE - Lauralee posted instructions for these cards on her blog. Making those butterfly wings pop is really a simple technique

Monday, May 17, 2010

A Few Last Dandelions

These are the last few cards that Lauralee created with the Rosewood Dandelion.

This first card has the dandelions stamped and embossed with white. Yellow ink was added to highlight the stamped imaged. I believe the sentiment is Hero Arts stamped in red. The corners were rounded and the stamped images were layered onto red cardstock. A couple of red brad and a wrap of red ribbon complete this beautiful card.


Close-up of same card. This photo really shows how much the addition of the yellow makes the dandelions pop off the card.


This card is so elegant. The dandelion was stamped and embossed in white. A scrap piece of white cardstock was punched to create an scallop edged layer. The addition of the red ribbon creates a classic layout. Sorry, once again I don't know who the sentiment is from.


Next post....daisies

Saturday, May 1, 2010

April Challenge Cards

The April Challenge was selected by Darlene this month shown here.
These sketches are really challenging for us.

Barb asked if she could join our challenges and this is the card she created. Barb has a Cricuit and used it to cut the images as well as the word "love" which she cut and layered to give dimension. My photo really doesn't do Barb's card justice.


It was Jess' turn to participate in the challenge this month and she made this rather quick card. The bows are from dollar store hair ribbons as is the bling. The sentiment is Inkadinkadoo stamped on a Spellbinder tag which was popped onto the base card.


Laurilee's card was beautiful as always, although she said this challenge was really difficult for her. She cut the 3 scalloped circles with a punch and ran it through Swiss Dots Cuttlebug folder and layered onto some gorgeous Bo Bunny paper. Then she used the Martha Stewart butterfly (her favourite punch all time the note says) from the same paper and added glitter. Co-ordinating ribbon was attached under the punched strip. The tag is a Nestibility stamped with a sentiment from Papertrey Ink and edged with Martha Steward pink ink. Laurilee always send great instructions with her cards.


The front of my card was embossed with the Sizzix Floral Flourish folder. The images from Inkadinkadoo Round Frames set were stamped 6 times; one set was cut out and popped over the bottom 3 images. The edges dragged with Memories Midnight blue and layered onto blue cardstock.


Darlene's card this month is quite different from her previous cards. The images are cut from her Cricuit and embossed with gold. She also embossed the edges of the green paper she used underneath the images. The stamped sentiment is Rosewood stamps also embossed in gold. Darlene used the most interesting wood grained paper layered onto her white base card. I will have to ask her exactly how she did the embossing on this card when I see her next.


The card Donna finally settled on turned out beautifully. She cut the butterflies from a Spellbinder Shapeability. She layered them onto the brown ribbon and added dollar store bling. The sentiment is Hero Arts.


Cassie decided she wanted to make this challenge as well. Her card made use of a Martha Stewart edge punch and a Spellbinder Nestibility Scalloped Cicle. She alternated the circles over a piece of ribbon and added a sticker to the centre circle.


I guess I will have to show the results of next month challenge brought to us by Laurilee in 2 posts next month. If you would like to join our challenge, let me know and I will let you know where to send your images. I will post the May challenge tomorrow.

Monday, March 29, 2010

Flower Power


I created this card at our play day using a technique shown here. (Jennifer McGuire does some amazing stuff!) The script is Rosewood French Script, stamped repeatedly in Memories Artprint Brown. Then I stamped and embossed Hero Arts "Floating Flowers" in clear over the script. With a dye ink I added colour to the open areas of the Hero Arts stamp. The flower is from Technique Tuesday "Pocket Full of Posies" stamped in the same dye ink and added blue accents with a Copic. I think will add dimensional product of some sort to the stamens, likely Glossy Accents. This is more my style, quick and easy

Wednesday, March 24, 2010

Card Challenges

Donna & I have talked for awhile about getting together for what we call play days. During the winter months we decided to meet at the store with our friend Darlene to make cards and generally chat about where ever our conversations lead us. One thing for sure there is always lots of laughter. The idea of a card challenge was born one night while Donna was talking to her cousin, Lauri. Unfortunately Lauri lives much too far from us to join us on play day but she always sends a card to Donna for our challenges. Donna chose our first challenge of red and white cards in honour of Valentine's day.


My card relied heavily on some gorgeous paper that looks handmade. The sentiment is a Cuttlebug die. The scalloped layering elements are Nestibility dies. The all over background is Hero Arts, Four Leaf Grid.


Lauri's card blew us away. She stamped the flowers on vellum and added a bit of colour to the reverse for interest. The Nestibility tag is stamped, distressed and attached with a leather strapping. The beauiful silver charm was the perfect finishing touch. (Sorry Lauri I misplaced your notes on the stamps used for this card)


Donna is an animal lover and she has always been fond of these Rosewood Teddies. She added black gems for the eyes and nose. She then added red flock to the pads of their feets. The red layering piece has been run through the Cuttlebug folder, Heart Blocks. The sentiment is Rosewood.


Darlene is a glitter girl. The double heart is a Rosewood stamp. The "ink well"(upper left), "just a note"(lower right), "hi there" and the centre band are all Cuttlebug folders. The raised parts of the Cuttlebug embossed images are hit with glue and embellished with glitter. Darlene's card is a gate fold of sorts, "hi there" creates a tab to open the card.


It was a lot of fun to see how everyone interpreted the requirements of the challenge. For March Liz chose a card sketch, seen here. As soon as Donna gets Lauri's card, I will show you the cards we came up with.

Sunday, February 7, 2010

Teddy Bear Blue


This cute little card, created by Donna is sweet birthday card. It would be the perfect for a baby shower card or even a get well soon card. That Teddy is just so cute. The pale blue ink was difficult to scan well enough for you to really see how well Donna co-ordinated the whole card.

Supplies:

background Hero Arts - Woordprints; Happy Birthday - Rosewood; Bear - Little Suzy's Zoo